


Top 15 Server Security Practices for 2020
In this article, we will denote the security best practices for 2020 and beyond. Because security is such a challenging subject for many, it often goes unheeded, and as such, many are caught unaware when an issue arises. By following these best practices, you can significantly lower your risk of being compromised by a malicious actor.
1. Be Aware. Educate Yourself.
To enhance server security, the first precedent we must adhere to is always being mindful of our security. Just as we lock our doors at night and ensure the windows of our cars are rolled up, good practice dictates that we are vigilant against the possibility of compromise.
Does this mean we are always logged into the server slaving over monitoring logs or constantly blocking connections in the firewall? Of course not. We have real-world lives that do not necessarily revolve around our WooCommerce store or our blogging platform of choice. Running our businesses can be a significant part of our day, especially if it puts your food on the table. We recommend taking a more holistic approach to security, and having a good plan in place in advance to deter most would be bad actors. This is a dependable and sound approach to ensuring your most important data is locked down, and accessible to only those who need access.
One last point here; Unfortunately, we often don't know what we don't know. Read that line again...
If you don't know what questions to ask, you will miss something. Do you need to be a security expert to be protected? No... but, it IS your responsibility to be mindful of the dangers that are out there that seek to do your business harm.
"But I pay for a fully managed service to keep me safe!"
No.
Security is a shared concern. That means both you and Liquidweb have skin in this game. Be sure to educate yourself.
2. Physical Security
a. Limit Server Access
Limiting server access to just those people that need it with the iptables firewall available on most Linux servers is advisable. The APF (Advanced Policy Firewall) allows for easy management of your iptables firewall rules. There is also the CSF (ConfigServer Firewall) that is more advanced, which controls your iptables but contains a more hardy feature set. The idea is to block any unused open ports in your server firewall. This way, only the needed ports to your server will communicate with the outside world. You can also implement cPHulk's brute force protection option via WHM to automatically block users that repeatedly try and fail to log in with invalid credentials to the running services.
Limiting physical access to the server and its contents should be our first line of defense. The questions to ask here are mainly geared towards where the server is physically housed. Is your server in your basement, or is it secured in a protected data center that has verified virtual and physical policies and procedures in place that focus on the physical integrity of the server?
Some questions that should be asked before housing your server are
- Who has physical access to my server? The monitoring team? Yes. Brenda from accounting? NO! not good. Knowing in advance who can touch the server answers many questions out of the gate.
- How does your hosting provider provide access control? Key cards or FOBs? Biometrics? Those neat retinal and palm print scanners we see in the movies? Depending on the level of security you need, these and other solutions may be called for. Granted, you are not storing nuclear launch codes but, John Q. Public depends on you to look out for him. They will demand that you treat the client's credit card info with the same level of respect because that is related to his livelihood.
- Lastly, how does your host log and test these systems? Do they have policies and procedures in place you can review? Do they follow the standards that NIST provides? These are only a few questions that can be asked when gathering info about the servers' physical security.
3. Secure Connections
a. VPN
A VPN or Virtual Private Network creates a secure "tunnel" or pipe from your computer to a secured network, across an unsecured network like the internet. This connection securely routes ALL traffic through the tunnel. A VPN gets you into your business network, so it should be considered your first layer of protection.
b. SSH
When command line (terminal) access to the server is needed, we utilize an SSH (Secure SHell) connection. This connection creates a secure pipe for your data to travel through. This type of connection provides for the integrity of your data while passing through an unsecured network like the internet. Does it route all of your traffic through this connection like a VPN? No. Only the information you send via the terminal from your computer to the server is secured. As a side note, you can use SSH within a VPN to add a second layer of protection to your data connection.
c. Fail2Ban
Fail2Ban is a server software that reviews specific log files and blocks IPs that exhibit signs of malicious behavior. Usually, legitimate login attempts take no more than a couple of tries to access the server (and if SSH keys are used, no more than one). Any server being hit with multiple unsuccessful logins within a given time usually indicates an attempt at malicious access.
Fail2Ban then provides updates to firewall rules to block suspect IP addresses for a specified amount of time. (although other actions can also be taken). Fail2Ban comes with a default set of filters for services like apache and ssh.
Fail2Ban can monitor several protocols, including HTTP, SSH, and SMTP. By default, Fail2Ban only monitors SSH but is a helpful security deterrent for any server since the SSH daemon is usually configured to run continuously and listen for connections from any remote IP address.
d. Restrict root access
SSH should be restricted to a limited subset of users. Accomplishing this task can be completed by adding the following info to the /etc/ssh/sshd_config file:
PermitRootLogin no
Protocol 2
The ssh users group should then be added to /etc/ssh/sshd_config:
AllowGroups sshuserse. SSHKeys
SSHKeys allows us to turn off the SSH feature that is needed to access the server as the root user, and it eliminates the need to use a root password. This provides an additional layer of security when connecting to the server. SSHKeys are more secure than using a password alone. Utilizing SSHKeys also allows us to create a cryptographically secure keypair which stores unique connection information locally on your computer and the server.
Because SSHKey pairs are generated cryptographically, typically, the larger the key size is, the more secure it is. The smallest key size is 1024 bits, and the maximum is 4096 bits. The number of bits of entropy will depend on the algorithm used, e.g. RSA
f. Alternate SSH Ports
Another layer of security (kind of) is modifying the port on which SSH listeners on. This ssh port setting can be modified to a random port. Usually, SSH uses port 22, but we recommend using a port range of 32768 to 61000. This being said, relying on security by obscurity is not an effective means of defending against incursions. IANA recommends using ports 49152 to 65535.
g. SFTP
When transferring files to and from the server, the preferred method is to use SFTP (secure FTP). SFTP allows you to securely connect to the server, similarly to how SSH is used. There are multiple FTP software titles like FileZilla or WinSCP that have excellent features to allow for this type of connection.
h. SSL
Always ensure the use of SSL certificates is enforced across all domains and services on the server. This way, even seemingly less important connections are protected.
i. EMail
Email continues to be one of the primary attack vectors that malicious actors use. This medium is widely used simply because it is a tool that is used by tens of millions daily. Luckily, almost everyone is now aware of the dangers of opening an unknown email, but this continues to be a problem in many companies, both large and small. Continued security training and ongoing reinforcement of security policies can limit this issue.
Our process for dealing with issues like this is if someone contacts Liquidweb and asks where to send their complaint about a customer of ours spamming them, or they have a phishing site they've found on our network, our previous answer was to ask them to email the Abuse Team.
Now, instead of asking the reporter to send in an email, we instead direct them to our contact form on our website. We then choose either Abuse or DMCA from the drop-down menu, depending on the nature of the complaint. This will ensure that an admin can review the report and act quickly!
If someone uses the old method and sends an email to abuse@liquidweb.com, they will receive an auto-reply that redirects them to the form on our Contact Us page for further assistance and the ticket created by their email is sent to our spam queue.
j. Secure Application Logins
Some typical applications you might access on your server might be WordPress, email, cPanel, or webmail. Connection methods can be configured for each service to allow for secure connections, so no information is transmitted via plaintext between your computer and the server.
Insecure Application logins
These default server applications can be accessed from any web browser and pass credential data in plaintext when accessed from any of these insecure URLs:
- cPanel - http://example.com/cpanel
- cPanel - http://example.com: 2082
- WHM - http://example.com:2086
- WHM - http://serverIP:2086
- Webmail - http://example.com/webmail
Secure Application Logins
To access these same services on your server over https, so that your credentials are encrypted and transmitted securely you would use these URLs:
- cPanel - https://example.com:2083
- WHM - https://example.com:2087
- Webmail - https://example.com:2096
You can log in to WHM and then navigate to Tweak Settings > Redirection and turn on Always redirect to SSL to force all cPanel applications to use https by default.
4. Use Strong Passwords
The first line of defense for most services on your server will be the strength of your passwords. To address this, ensure that you are always using a strong password for anything that accesses the server. Below are a few guidelines for keeping the server safe.
a. Use Password Management Software
NIST now recommends the use of a password manager for the storage and dissemination of passwords. This software allows for stronger and more secure passwords to be used daily. Liquidweb does not have an official recommendation, but these are the ones most suggested by other reviewers online:
b. Use A Passphrase Instead of a Password
When choosing a password, it's often better to use an altered phrase or a passphrase that's easy to remember but hard to guess. Here is a perfect example: T0 3Rr 1$ Hum@N, t0 F0rg1v3 D1v1n3!
The howsecureismypassword.net website states the above passphrase would take a computer about 2 SEXDECILLION YEARS (that's 1051 power or a 1 followed by 51 zeros, or in Great Britain 1096 or by 1 followed by 96 zeros) to crack your password
c. Expire passwords After X Time
The chage command lists and changes the password aging info for a Linux user account. The chage -l command lists specific info for a user and the chage -M command modifies the value of the number of days before the password expires again:
 [root@host ~]# chage -l user
 Last password change : Jan 01, 2019
 Password expires : never
 Password inactive : never
 Account expires : never
 Minimum number of days between password change : 0
 Maximum number of days between password change : 90
 Number of days of warning before password expires : 7

[root@host ~]# chage -M 90 user
 Last password change : Jan 1, 2019
 Password expires : March 1, 2019
 Password inactive : never
 Account expires : never
 Minimum number of days between password change : 0
 Maximum number of days between password change : 90
 Number of days of warning before password expires : 7
 [root@host ~]#
d. Password Policy Requirements
As stated in our earlier article on password security, make sure you are following the latest NIST standards for your password policy.
e. Define what passwords NOT to use
Do not use words commonly found in the dictionary, people's names, well know places, events, or pet names. Do not reuse passwords or use an adjacent keyboard string of characters.
5. Turn Off All Unnecessary Services
a. Audit Services
Service auditing explores what services are actively running on the server, the protocols they are using, and the ports they are interacting with. Being conscious of these factors will help lessen any attack vectors in the system.
Because most servers will come with certain services enabled by default. These services can allow you to utilize multiple features available on the server, but if these extra services are not being utilized, it is best to disable them. How do you find those services? Running the following commands on a RedHat based system outputs the following lists:
Redhat/CentOS Enabled Services
systemctl list-unit-files | grep enabled[root@host ~]# systemctl list-unit-files | grep enabled var-lib-snapd-snap-core-7917.mount enabled var-lib-snapd-snap-hello\x2dworld-29.mount enabled var-lib-snapd-snap-snapcraft-3440.mount enabled acpid.service enabled auditd.service enabled autovt@.service enabled crond.service enabled dbus-org.fedoraproject.FirewallD1.service enabled firewalld.service enabled getty@.service enabled irqbalance.service enabled microcode.service enabled NetworkManager-wait-online.service enabled postfix.service enabled qemu-guest-agent.service enabled rhel-autorelabel.service enabled rhel-configure.service enabled rhel-dmesg.service enabled rhel-domainname.service enabled rhel-import-state.service enabled rhel-loadmodules.service enabled rhel-readonly.service enabled rsyslog.service enabled sonarpush.service enabled sshd.service enabled systemd-readahead-collect.service enabled systemd-readahead-drop.service enabled systemd-readahead-replay.service enabled tuned.service enabled snapd.socket enabled default.target enabled multi-user.target enabled remote-fs.target enabled runlevel2.target enabled runlevel3.target enabled runlevel4.target enabled [root@host ~]#
and running the following command outputs:
systemctl | grep running[root@host ~]# systemctl | grep running session-2969.scope loaded active running Session 2969 of user root acpid.service loaded active running ACPI Event Daemon auditd.service loaded active running Security Auditing Service crond.service loaded active running Command Scheduler dbus.service loaded active running D-Bus System Message Bus firewalld.service loaded active running firewalld - dynamic firewall daemon getty@tty1.service loaded active running Getty on tty1 irqbalance.service loaded active running irqbalance daemon polkit.service loaded active running Authorization Manager postfix.service loaded active running Postfix Mail Transport Agent rsyslog.service loaded active running System Logging Service serial-getty@ttyS0.service loaded active running Storm management console on Serial Getty ttyS0 snapd.service loaded active running Snappy daemon sonarpush.service loaded active running LiquidWeb Sonarpush Monitoring Agent sshd.service loaded active running OpenSSH server daemon systemd-journald.service loaded active running Journal Service systemd-logind.service loaded active running Login Service systemd-udevd.service loaded active running udev Kernel Device Manager tuned.service loaded active running Dynamic System Tuning Daemon dbus.socket loaded active running D-Bus System Message Bus Socket snapd.socket loaded active running Socket activation for snappy daemon systemd-journald.socket loaded active running Journal Socket systemd-udevd-control.socket loaded active running udev Control Socket systemd-udevd-kernel.socket loaded active running udev Kernel Socket [root@host ~]#
To disable a service, use:
systemctl disable bluetoothDebian/Ubuntu Running Services
The following commands will show you the running services on a Debian/Ubuntu based server:
service --status-all |grep '+'root@host ~# service --status-all |grep '+' [ + ] apache-htcacheclean [ + ] apache2 [ + ] apparmor [ + ] apport [ + ] atd [ + ] binfmt-support [ + ] cron [ + ] dbus [ + ] ebtables [ + ] grub-common [ + ] irqbalance [ + ] iscsid [ + ] lvm2-lvmetad [ + ] lvm2-lvmpolld [ + ] lxcfs [ + ] procps [ + ] rsyslog [ + ] ssh [ + ] udev [ + ] ufw [ + ] unattended-upgrades root@host ~#
lists the state of the services regulated by systemV. The plus (+) and (-) indicators tell us if the service is active or not.
systemctl | grep runningroot@host ~# systemctl | grep running proc-sys-fs-binfmt_misc.automount loaded active running Arbitrary Executable File Formats File System Automount Point init.scope loaded active running System and Service Manager session-1726.scope loaded active running Session 1726 of user root accounts-daemon.service loaded active running Accounts Service apache2.service loaded active running The Apache HTTP Server atd.service loaded active running Deferred execution scheduler cron.service loaded active running Regular background program processing daemon dbus.service loaded active running D-Bus System Message Bus getty@tty1.service loaded active running Getty on tty1 irqbalance.service loaded active running irqbalance daemon lvm2-lvmetad.service loaded active running LVM2 metadata daemon lxcfs.service loaded active running FUSE filesystem for LXC networkd-dispatcher.service loaded active running Dispatcher daemon for systemd-networkd polkit.service loaded active running Authorization Manager rsyslog.service loaded active running System Logging Service serial-getty@ttyS0.service loaded active running Storm management console on Serial Getty ttyS0 snapd.service loaded active running Snappy daemon ssh.service loaded active running OpenBSD Secure Shell server systemd-journald.service loaded active running Journal Service systemd-logind.service loaded active running Login Service systemd-networkd.service loaded active running Network Service systemd-resolved.service loaded active running Network Name Resolution systemd-timesyncd.service loaded active running Network Time Synchronization systemd-udevd.service loaded active running udev Kernel Device Manager unattended-upgrades.service loaded active running Unattended Upgrades Shutdown user@0.service loaded active running User Manager for UID 0 dbus.socket loaded active running D-Bus System Message Bus Socket lvm2-lvmetad.socket loaded active running LVM2 metadata daemon socket snapd.socket loaded active running Socket activation for snappy daemon syslog.socket loaded active running Syslog Socket systemd-journald-audit.socket loaded active running Journal Audit Socket systemd-journald-dev-log.socket loaded active running Journal Socket (/dev/log) systemd-journald.socket loaded active running Journal Socket systemd-udevd-control.socket loaded active running udev Control Socket systemd-udevd-kernel.socket loaded active running udev Kernel Socket root@host ~#
To disable a service, use:
systemctl disable apacheRemove X Windows from the system.
Most servers do not require the need for a GUI for general server administration tasks. Some servers may use a management panel to perform administrative tasks. This is fine, but know how many open paths there are to the server and only enable the ones you absolutely need.
yum groupremove “X Window System"6. Keep Your System Updated
Keeping all of your software up to date is the single most significant security precaution you can take for any operating system–be it desktop, mobile, or server. Software updates range from critical vulnerability patches to minor bug fixes, and many software vulnerabilities are actually patched by the time they become public.
a. Don’t use default yum-updates.
Updates are critical to keeping your system secure, but default versions of yum-updatesd are faulty; instead, apply updates by setting up a cron job. This can be accomplished through the following steps:
- Disable the yum-updatesd service: /sbin/chkconfig yum-updatesd off
- Create the yum.cron file:
!/bin/sh
/usr/bin/yum -R 120 -e 0 -d 0 -y update yum
/usr/bin/yum -R 10 -e 0 -d 0 -y update
This file should executable and placed in /etc/cron.daily or /etc/cron.weekly.
b. Hide Server Information
Try to provide as little information about the underlying infrastructure as possible. The less that is known about the server, the better.
Also, it is a good idea to hide the version numbers of any software you have installed on the server. Often they reveal, by default, the exact release date which can aid hackers when searching for weaknesses. It is usually simple to remove this information by deleting it from the HTTP header of its greeting banner.
7. Limit Website Access
You should review website access logs for unwanted activity and block unwanted users from your website if you find any. Blocking bad users at the website level is a good step before blocking them in your server's firewall. If you are using a CMS such as WordPress to run your website, make sure you're protected from things like a WordPress Brute Force attack by using WordFence or a similar product, so your account is safe as well.
8. Configure a Firewall
Using a firewall like IPtables to block unwanted inbound traffic to your server is a highly effective security layer. By being very specific about the traffic you allow in, you can prevent intrusions and other attempts to gain access from the internet. A best practice is to allow only the traffic you need and deny everything else.
The newest alternative available now is nftables. nftables is a new framework for packet classification that intends to replaces the existing iptables base. nftables is available in the Linux kernel 3.13 and above. nftables also comes with a newly implemented command-line utility called nft. nft's command line syntax is much simpler from iptables.
9. Setup Audits
File monitoring is an excellent way to find or detect unwanted file changes on the system. We call this task auditing. Linux used audit.d to keep track and record many of the characteristics of the system files when they are in a healthy state and later compare it to a then altered state. By contrasting different versions of the same files side by side, we can detect any inconsistencies that exist and track the changes.
10. User Management
a. Monitor Login Attempts
HIDs (Host Intrusion Detection systems) examines what files are being accessed, what applications are being used, and what data is in the kernel logs.
NIDs (Network Intrusion Detection systems) evaluates the flow of data between computers within a network. They typically "sniff" those connections for suspicious behavior.
HIDS can be used for a more well-rounded solution, and NDIS is mainly used for a LAN based solution. A selection of HIDs are as follows:
- OSSEC
- Wazuh (A fork of OSSEC that offers more reliability and scalability)
- Tripwire
- Samhain
- Security Onion
NIDS and HIDS can be used in conjunction to form a strong, comprehensive IDS strategy. A selection of NIDs are as follows:
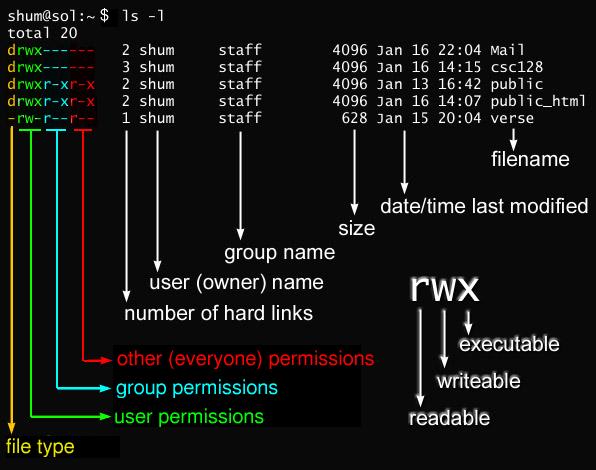
b. Limit User Permissions
To ensure only the needed users have access to critical systems, limit the permission sets they have to 644 or 444 for files and 755 for folders.
c. Perform User Testing
Set up a specific date to perform a security audit and let users know in advance it is coming. Define your expectations and hold them accountable for any noted deficiencies.
d. Ongoing Security Training
Send out monthly reminders and do training every three months, with six-month dry runs across multiple areas (email, network, and physical) and track failures to improve and add additional training in those areas.
e. Travel Security
Security does not just end at the front door of your business. Setting up security parameter training for employees traveling abroad is a smart choice in today's world.
11. Securing the Filesystem
There are several steps you can take to secure the filesystem on the servers. Always mount filesystems with user-writable directories on separate partitions. Also, use nosuid, nodev, and no exec in the /etc/fstab file.
a. Make sure /boot is read-only
Ensure that the /boot folder is set to RW mode by default, despite only being used for reading/loading modules and the kernel. It should also be set to read-only in /etc/fstab:
/dev/sda1 /boot ext2 defaults ro 1 2b. Disable booting from removable media.
To accomplish this, you will need to modify the bios setting to disable booting from removable media like a USB stick.
c. Set a password for the GRUB bootloader.
If someone has physical access to the server, they can possibly get into the server. Another wall we can setup between an attacker and access to the server is to set a password on the GRUB bootloader. We can accomplish this by setting up a password to limit access. First, we backup the current grub.conf file.
root@host ~# cp /etc/grub.conf /etc/grub.conf.bakNext, we generate a secure password. We create a file, then create the password using the grub-md5-crypt command. You will then be prompted twice to enter a password. We then copy the created password from the secure file into the grub.conf file.
root@host ~# touch secure
root@host ~# grub-md5-crypt > secure
After this, we copy the password and paste it into the grub.conf file after the first line (in Redhat), as shown below. Then we hit ":wq" in vim to save the file.
splashimage=(hd0,0)/grub/splash.xpm.gz
password --md5 JnK!xdBep53lt1NVk@K6wb!js%!HEI#^
You will then need to reboot the server in order for the changes to take effect.
d. Prompt for the root password before entering single-user mode.
If a malicious actor has physical access to the server, they can select a specific kernel to boot into from the grub menu item by pressing the "e" key. This, in effect, allows someone to edit the first boot option to enable booting into single-user mode without being asked for a password.
Your system should be configured to prompt for the root password before entering single-user mode to limit possible exploitation. This can be accomplished by following the instructions above in "Set a password for the GRUB bootloader."
12. Utilize SELinux
SELinux is a kernel-based security module that provides a mechanism for supporting access control security policies, including mandatory access controls (MAC). It is primarily used as a means to adjust access control requirements. With SELinux, you can designate what a process or user can do. It can limit operations to their own domain, so any actions can only interact from allowed domains with certain file types or other processes. SELinux can exist in any of these three possible modes:
- Enforcing - SELinux is active and enforcing the defined policy.
- Permissive - Mainly used for testing. Enforcement is not applied but is logged.
- Disabled - the system is inactive.
13. Using Multi-Server / Isolated Environments
a. Use A Multi-Server Environments
Isolation is one of the best types of server protection you can have. Full separation would require having dedicated bare-metal servers that do not share any components with other servers. Although this is the easiest to manage and provides the most security, it is also the most expensive. Having isolated execution environments in a data center allows for the so-called Separation of Duties (SoD) and setting server configuration according to the functions the server fulfills.
Separating database servers and web application servers is a standard security practice. Separate execution environments are especially beneficial in a larger scale business that cannot afford any security breaches. Independent database servers secure sensitive information and system files from hackers that manage to gain access to administrative accounts. Also, isolation lets system administrators to separately configure the web application security and minimize the attack surface by setting web application firewalls.
b. Use Virtual Isolated Environments
If you cannot afford or do not require full isolation with dedicated server components, you can also choose to isolate execution environments. Doing so helps you deal with any security problems that may arise, ensuring other data is not compromised. You can choose between containers (which sit on top of the host OS) or VM virtualization, which are much easier to set up.
Another option for virtualized environments in a UNIX operating system is creating chroot jails. Chroot is separating a process from the central operating system’s root directory and allowing it to access only files within its directory tree. However, this is not complete isolation and should be practiced only with other security measures.
14. Backups
a. 3-2-1 Policy
As always, backups are still a required part of every security protocol. We recommend using the 3-2-1 rule of backup retention.

b. Backup Testing
Always test your backup systems in advance and clearly document the procedures and process for restoring them.
15. Using LUKS Encryption
In order to configure LUKS on CentOS, the cryptsetup package is required. This software is installed by default in later versions of CentOS. You can use the cryptsetup command to encrypt specific disks or partitions to secure all of the information stored on it.
[root@host ~]# cryptsetup luksFormat /dev/sdc
WARNING!
========
This will overwrite data on /dev/sdc irrevocably.
Are you sure? (Type uppercase yes): YES
Enter LUKS passphrase:
Verify passphrase:

[root@host ~]# cryptsetup -v luksOpen /dev/sdc mysecuredrive
Enter passphrase for /dev/sdc:
Key slot 0 unlocked.
Command successful.

[root@host ~]# mkfs.xfs /dev/mapper/mysecuredrive
[root@host ~]# mkdir -p /mnt/my_secure_drive
[root@host ~]# mount -v /dev/mapper/mysecuredrive /mnt/my_secure_drive/

(***you may get an SELinux warning here***)

mount: /mnt/my_secure_drive does not contain SELinux labels.
       You just mounted an file system that supports labels which does not
       contain labels, onto an SELinux box. It is likely that confined
       applications will generate AVC messages and not be allowed access to
       this file system.  For more details see restorecon(8) and mount(8).
mount: /dev/mapper/mysecuredrivemounted on /mnt/my_secure_drive.

[root@host ~]# restorecon -vvRF /mnt/my_secure_drive/

Relabeled /mnt/my_secure_drive from
system_u:object_r:unlabeled_t:s1 to
system_u:object_r:mnt_t:s1

mount -v -o remount /mnt/my_secure_drive/
mount: /dev/mapper/mysecuredrive mounted on /mnt/my_secure_drive

(***no selinux warnings seen***)

[root@host ~]# cryptsetup luksDump /dev/sdc
LUKS header information
Version:       	2
Epoch:         	3
Metadata area: 	12288 bytes
[……]
	Digest:     49 20 4c 6f 76 65 20 77 72 69 74 69 6e 67 20 61
                    62 6f 75 74 20 6c 69 6e 75 78 22 2f 47 55 b7 8f
Want to know more?
We all value our security and look for ways to protect our data. Using this guide will definitely move you in the right direction.
Related Articles:


About the Author: David Singer
I am a g33k, Linux blogger, developer, student, and former Tech Writer for Liquidweb.com. My passion for all things tech drives my hunt for all the coolz. I often need a vacation after I get back from vacation....


Our Sales and Support teams are available 24 hours by phone or e-mail to assist.
Latest Articles
How to Clone a Drupal Site to Another Domain
Read ArticleTop Eight Virtualization Security Issues and Risks
Read ArticleAccessing Man Pages on Ubuntu 16.04 LTS
Read ArticlePremium Business Email Pricing FAQ
Read ArticleMicrosoft Exchange Server Security Update
Read Article